Skip to content Skip to cookie consent
Skip to content

Articles

Sharing a skill

Sharing a skill is itself a skill that can be learnt

1995 Available in English, French, Portuguese and Spanish

Footsteps magazine issues on a wooden desk.

From: Training – Footsteps 22

Different approaches to training and facilitation

We can all remember times when we were taught skills. Sometimes a difficult skill was made easy with clear training, and has remained with us ever since. At other times training was confused; an easy skill was made difficult and we still cannot do that skill.

What is the difference between good and bad training? Sharing a skill is itself, a skill that can be learnt. Thinking about the following points may help you become a better trainer.

Know who you are instructing

Take time to consider who the learners are. Their background will greatly affect the style, manner and content of instruction.

The learners’…

  • gender
  • age
  • interests and needs
  • previous experience
  • related skills
  • related knowledge
  • abilities/disabilities
  • literacy/numeracy level
  • language and mother tongue

…will affect the trainer’s…

  • manner
  • speed
  • vocabulary
  • starting point
  • teaching method
  • assumptions
  • lesson content
  • language of instruction.

Set your objectives

Too much training is based on what the trainer wants to teach, rather than what the learner needs and wants to learn. Skill sharing needs to be learner-centred rather than trainer centred. So an objective needs to start with a phrase like, ‘By the end of this instruction, the learner will be able to…’

A good objective answers the questions…

  • What will the learner do?
  • How will they do it? With what? Where?
  • To what standard will the skill be done?

Many objectives are too vague. At the end of the instruction it is difficult to tell whether the objective has been achieved or not. A good objective is clear and measurable.

All instruction must be completed in a limited time, so it is important that objectives are realistic, both in terms of what the learner can achieve, and in terms of the time available.

Identify learning stages and key points

All but the simplest skills can be divided into learning stages. The learner needs to be able to do each stage before moving to the next. At each stage there will be key points to emphasize:

  • important things to look out for
  • common errors that people make
  • safety or legal points that must be noted.

Keep the number of key points to a minimum. Don’t make the skill more difficult than it is!

Preparing your presentation

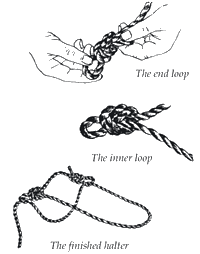
It is useful to write a Skills Training Plan, perhaps similar to the following the example presentation below.

Example presentation: making a temporary halter 

  • The introduction is very important. How will you motivate the trainees? Set the scene; the skill they are learning today may link back to other skills they can do already. Why is the skill worth learning? State clearly your objectives. Create a friendly learning atmosphere.
  • Plan the main part of the instruction. With some skills it is a good idea to demonstrate the whole skill quickly, then repeat it – this time slowly, stage by stage – allowing the trainees to do the skill at the same time.


Skills Training Plan for 'Making a temporary halter'

Skills Training Plan

Preparation

Skill

Making a halter

Objective


Learner

group

Trainees will learn to tie a temporary halter for sheep, goat or calf


Bagamoyo Farmers' Group, 8 farmers expected

Where and when

Bagamoyo – Mr Ali’s farm, 4/5/95 10am-12 noon

Equipment needed

8 lengths of rope, 2 metres long, 7-10mm in diameter. 8 sheep or goats

Presentation

INTRODUCTION

Very useful for examining young animals, when vaccinating, giving treatment or when taking young animals to market

5mins

DEMONSTRATION

Demonstrate twice

30 mins

Learning stages


1. Choosing a rope

Key points


*A rope 2 metres minimum in length, and 7mm to 10 mm diameter

*The rope must not be too thin or it will rub painfully on the animal

2. Tie the end loop

Make the loop as small and as near the end as possible

3. Tie the inner loop

*The correct distance between the loops varies with the size of animal; about 120mm for a small sheep or goat; 150-180mm for large calves

4. Complete the halter

*Thread the other end of the rope through the end loop first, then through the inner loop

5. Understand the parts of the halter

*The rope between the loop knots is called the ‘fixed band’; it cannot lengthen or shorten

*The rope with which you can lead the animal is called the ‘lead rein’

6. Understand how the

halter fits

on the animal

*The ‘fixed band’ must go over the nose, not under the jaw. If it goes under the jaw breathing maybe constricted.

*From the lead rein the rope first goes under the jaw, not over the skull. The halter is then less likely to slip.

*The handler generally stands next to the left of the animal, so the ‘lead rein’ must come from the left.

Trainee Practice

Group work in pairs

70 mins

Assessment

Check each halter when completed

5mins

Conclusion

Farmers should repeat the learning stages and key points.

Remind the trainees that this halter is only for temporary use

10mins


Group work

1. If you are holding a group discussion on skills sharing, try this role play. Ask four participants to act out two different situations. In each, an instructor is teaching a learner how to make a pot of tea. Don’t tell the other participants about the roles being played.

  • An army sergeant instructing a new recruit
  • A mother instructing a 6 year old child

Afterwards discuss the role play. Can other participants guess the roles that were being played? What were the differences between the two situations – even though both were about the same skill? How did they differ in manner, in the words used, in speed, in the assumptions made, in body language?

2. Think of a training situation that group members may face in the future; perhaps with a farmer’s group, a group of community health workers, or a group of school children. What information do they, as trainers, need to have about the learner group to help plan the training? List the information needed.

3. Discuss the following objectives. Are they good or bad? Why? Do they satisfy the points made above?

  • To teach the group about welding.
  • To change the front wheel on a tractor.
  • The learners will be able to take the temperature of a child.
  • To show the trainees how to bud-graft citrus seedlings using the T method.
  • The learners will be able to pick out eggplant seedlings from seedbed into trays, at a rate of 45 a minute with 9 out of 10 seedlings surviving.

4. Ask each participant to write their own Skills Training Plan on any skill they want to share. Such skills can be on any subject – health, agriculture, forestry, building, craft work, etc. Let each person instruct another group member in this skill. After each instruction, discuss as a group both the good points and anything that could be improved.

  • Allow plenty of time for trainee practice. We learn by doing a skill, more than by hearing and seeing others doing it.
  • Plan how you will assess at the end whether the trainees have acquired the new skill.
  • Conclude by repeating the main points. Mention related skills that the trainees may be learning in the future.

NOTE:

The halter shown in this example is only for temporary use. After a while the knots will rub sores on the animal’s head. A person skilled at knots (splicing) could make a similar permanent halter without big knots.

A larger halter can be used on adult cattle, but the animal will need to be halter-trained from a young age.

Mike Carter works in the International Department at Bishop Burton College, Beverley, N Humberside, UK, with experience in Kenya, Papua New Guinea and Nigeria.

Similarly Tagged Content

Share this resource

If you found this resource useful, please share it with others so they can benefit too.

Subscribe to Footsteps magazine

A free digital and print magazine for community development workers. Covering a diverse range of topics, it is published three times a year.

Sign up now - Subscribe to Footsteps magazine

Cookie preferences

Your privacy and peace of mind are important to us. We are committed to keeping your data safe. We only collect data from people for specific purposes and once that purpose has finished, we won’t hold on to the data.

For further information, including a full list of individual cookies, please see our privacy policy.

  • These cookies are necessary for the website to function and cannot be switched off in our systems.

  • These cookies allow us to measure and improve the performance of our site. All information these cookies collect is anonymous.

  • These allow for a more personalised experience. For example, they can remember the region you are in, as well as your accessibility settings.

  • These cookies help us to make our adverts personalised to you and allow us to measure the effectiveness of our campaigns.